Nissan Altima (L32) 2007-2012 Service Manual: Diagnosis system (AV control unit)
Diagnosis Description
DESCRIPTION
• Diagnosis function consists of the self-diagnosis mode performed automatically and the CONFIRMATION/ ADJUSTMENT mode operated manually.
• Self-diagnosis mode checks for connections between the units constituting this system, analyzes each individual unit at the same time, and displays the results on the LCD screen.
• CONFIRMATION/ADJUSTMENT mode is used to perform trouble diagnosis that requires operation and judgment by an operator (trouble that cannot be automatically judged by the system), to check/change the set value, and to display the History of Errors of the multi AV system.
DIAGNOSIS ITEM

OPERATION PROCEDURE
1. Start the engine.
2. Turn the audio system off.
3. While pressing the “SETUP” button, turn the volume control dial clockwise or counterclockwise for 30 clicks or more. (When the self-diagnosis mode is started, a short beep will be heard.)

4. The initial trouble diagnosis screen will be displayed, and items “Self-Diagnosis” and “Confirmation/Adjustment” can be selected.

SELF-DIAGNOSIS
1. Perform self-diagnosis by selecting “Self-diagnosis”.
• Self-diagnosis subdivision screen is displayed, and the selfdiagnosis mode starts.
• A bar graph visible on the center of the self-diagnosis subdivision screen indicates progress of the trouble diagnosis.
NOTE: Self-diagnosis requires approximately 10 seconds to complete.

2. Diagnosis results are displayed after the self-diagnosis is completed.
The unit names and the connection lines are color-coded according to the diagnostic results.


Note: • Only the control unit (AV control unit) is displayed in red.
• If multiple malfunctions occur at the same time for a single unit, the screen switch colors are determined according to the following order of priority: red > yellow > gray.
3. Select a switch on the “SELF DIAGNOSIS” screen and comments for the diagnosis results will be shown.

Self-Diagnosis Results\


CONFIRMATION/ADJUSTMENT MODE
1. Start the diagnosis function and select “Confirmation/Adjustment”. The confirmation/adjustment mode indicates where each item can be checked or adjusted.
2. Select each button on the “Confirmation/Adjustment Mode” screen to display the relevant trouble diagnosis screen. Press the “BACK” button to return to the initial Confirmation/Adjustment Mode screen.

Display Diagnosis

Vehicle Signals
A comparison check can be made of each actual vehicle signal and the signals recognized by the system.


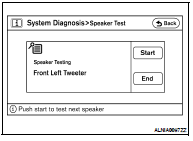
Speaker Test
Select “SPEAKER TEST” to display the speaker diagnosis screen. Press “START” to generate a test tone in speakers. Press “End” to stop the test tones.
NOTE: The speakers are tested in the following order: Front left tweeter > front center > front right tweeter > front right > rear right > woofer > rear left > front left

Navigation
The XM NavTraffic subscription status can be checked.

Error History
The error record displays the time and place of the most recent occurrence of that error. However, take note of the following points.
• If there is a malfunction with the GPS antenna circuit board in the AV control unit, the correct date and time of occurrence may not be able to be displayed.
• Place of the error occurrence is represented by the position of the current location mark at the time an error occurred. If current location mark has deviated from the correct position, then the place of the error occurrence cannot be located correctly.
Vehicle CAN Diagnosis
• CAN communication status and error counter is displayed.
• The error counter displays “OK” if any malfunction was not detected in the past and displays “0” if a malfunction is detected. It increases by 1 if the condition is normal at the next ignition switch ON cycle. The upper limit of the counter is 39.
• The error counter is erased if reset.


Handsfree Phone
The hands-free phone reception volume adjustment, microphone test and memory erase functions are available.

Bluetooth
Passkey confirmation/change
• The passkey of Bluetooth can be confirmed and changed.
• The passkey can be changed by four digits within 0 to 9.

Device name confirmation/change
• The device name of Bluetooth can be confirmed and changed.
• The device name can be changed by sixteen digits within A to Z (small character can be used) and - (hyphen).

XM SAT
• Change Channel
- Any necessary channels required to receive traffic information from the satellite radio system can be set.

• Change Application ID
- Any application ID's required to receive traffic information from the satellite radio system can be set.

• Change EXT ID
- Any EXT ID's required to receive traffic information from the satellite radio system can be set.

CONSULT - III Function (MULTI AV)
CONSULT-III can display each diagnostic item using the diagnostic test modes shown following.

SELF-DIAG RESULTS
Display Item List
Refer to AV-389, "DTC Index".
DATA MONITOR
Display Item List


 Hands free phone system (sedan)
 Component diagnosis